
Differential Drive Robot Environment Mapping
Content by:- Asiri Sirithunga
Design a robot model
Choosing an appropriate robot chassis for the design is the first step of the process. The move base package is only designed for use with the square shape chassis. Also, it will work with cylindrical chassis as well. If we choose a rectangular or triangle shape chassis, its performance will drastically reduce. Therefore, the cylindrical shape will be used here.
A sensor is essential for retrieving data of the environment. When you select a sensor, there is a bunch of alternatives in the market these days. Also, there are lots of facts to consider. The indoor navigation of the mobile robot can be done using a light detection and ranging sensor (LiDAR) because of the fewer interruptions in indoor navigation than in outdoor navigation.
LiDAR emits light particles (photons). The photons then bounce back to the sensor. By measuring distance and time to every object, it publishes that data. Here we are going to use Hokuyo LiDAR hence, its gazebo plugin is available.
In ROS, we can use URDF for defining the robot model. The xacro can also be used in both rviz visualization and Gazebo. So, we define the robot in xacro. We maintain two xacros, one for defining the links and joints and the other for the plugins. Plugins are used for defining the sensor behavior. The sensor and the differential drive are subscribed and published to relevant topics to behave as expected.
Spawn in Rviz and Gazebo
In this step, we create a launch file to spawn the robot model into our development environment. The inorder spawning is used to do that. When launching this file, all the topics, links, and joints will be configured. You can create a building model using gazebo building editor tool. It can be easily added to a world at the same time.
Slam – Gmapping
The gmapping package provides laser-based Simultaneous Localization and Mapping, as a ROS node called slam_gmapping. Using slam_gmapping, you can create a 2-D occupancy grid map from laser and pose data collected by a mobile robot. We will be using a teleop-twist-keyboard package for teleoperation of the robot.
Description
This demo is for beginners who just started learning Ros. You will learn how to create a robot model and insert plugins to work in gazebo. Apart from that you will see how packages teleop-twist-keyboard and slam-gmapping work. At the end you will have a map generated in rviz. Happy learning.
Create a catkin workspace
You must have Ros kinetic kame installed. Navigate to the directory you want to work with and open in the terminal. Then execute the following commands.
mkdir -p ws_twrobot/src

cd src/

catkin_init_workspace
Clone the package into your source folder
git clone https://github.com/AsiriSirithunga/tw-robot.git
Now you have the created package, and you are good to move forward. Install the system dependencies.
cd ..

rosdep update

rosdep install --from-paths src --ignore-src --rosdistro=kinetic -y
For an example you can install the gmapping package by executing the command below.
sudo apt-get install ros-kinetic-gmapping
Likewise install all the required packages.
Build and source the workspace
When you install all the dependencies you will see this text ‘ #All required rosdeps installed successfully’. It’s time to build the package.
catkin build

source devel/setup.bash
Start gazebo and rviz
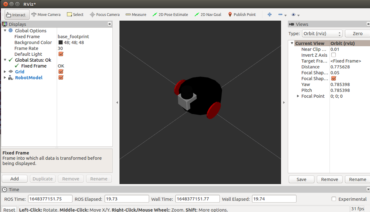
Launch rviz.
roslaunch tw-robot twrobot_base_rviz.launch
You can visualize the robot model and the environment in the gazebo. First, terminate the rviz. Then execute the command below.
roslaunch tw-robot twrobot_base_rviz_gazebo.launch
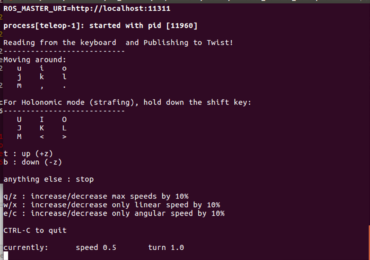
Teleoperation demo
Using this package, you can move the robot. First open the rviz and gazebo. Then open a new terminal in the workspace. Then execute the commands below.
source devel/setup.bash

roslaunch tw-robot twrobot_control_teleop.launch
While opening the terminal you can control the robot using a keyboard.
Slam – Gmapping demo
In this stage you can generate a map of the gazebo world and load the same map into rviz. Open a new terminal and execute the commands below.
source devel/setup.bash

roslaunch tw-robot slam_gmapping.launch

After exploring the whole world, you can save the generated map in the yaml format using the following commands. Open a new terminal and navigate to the maps folder inside the tw-robot package. Execute the command below to save the map.
rosrun map_server map_saver -f sample_room
Then add the below node into the rviz gazebo launch file.
<!--Map Server-->

  <node pkg="map_server" type="map_server" name="map_server" args="$(find tw-robot)/maps/sample_room.yaml" respawn="false">

    <param name="frame_id" value="/odom" />

</node>
Great work! I would suggest you study more about robot navigation. After you have done this, you will be able to use Amcl and Move Base packages for further development.
Everything you need is in the ROS documentation.